Tanning Deer Hides for Buckskin and Clothing Leather
Learning a new craft takes time, and tanning deer hides is one that you'll need to practice a lot as part of your survival preparations so that you can be sure about the speed of the process and the quality of the leather that you'll produce.

You should wait until mating season to pick your deer as earlier in the season they will still be skinny, which will directly affect the size of the pelt you'll get. There is no real difference between the skin of bucks and does, but you should take care with your shooting as bullets leave unsightly holes in the skin.
Basics of Tanning Deer Hides
There is no overall right way when it comes to tanning hides, and you'll find that each person will go about the process of tanning deer hides differently, but the basic process is as follows:
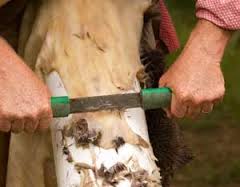
- Prepare the pelt - the preparation of the skin will determine the overall quality of your tanning process. It's at this stage that you remove all the hair, fat and muscle still attached, as well as removing any imperfections like moles and warts that will stop you from having a completely flat pelt. Ideally you should skin the animal as soon as you've killed it so that the skin doesn't start to decay. Once it's cool, cover the inside with salt to keep it fresh.
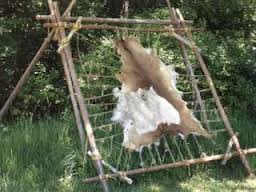
- Flatten or stretch - once the hide is completely clean, you need to put it in a cold dry place to dry out. When it comes to tanning deer hides, some people like to simply flatten it out under a pile of planks while others prefer to stake it out to stretch it into shape. Both are good options, but you need to make sure that you give it enough time for all of the natural moisture in the skin to evaporate. Depending on where in the country you live and where you've put the pelt to dry, this process will take anywhere from a couple of days to a couple of weeks, but you'll know it's ready when the skin feels crispy to the touch.
- Coat the hide - at this point, you'll need tanning solutions. Purists will recommend simply boiling the brains of your deer as this will release enough lecithin to coat the animal. However, for the squeamish or well prepared, a mixture of water, salt, bran flakes, battery acid and baking soda will do the trick. This mixture won't go bad so you should make a large batch as part of your survival preparations to save time in the long run. Mix the ingredients together and then soak the skins in large barrels, stirring occasionally to make sure you get an all over coverage. Leave them for an hour or so, then rinse in a bucket of clean water to remove the acid.
- Dry and brush - when it's time to dry out your hide, you will need a stretcher to give the pelt the flexibility you'll need to turn it into clothing. A wood pallet works fine, and you need to use long needle point nails to hold it in place as they will provide the strength to keep it stretched out without ruining the pelt. It will generally take four or five days for a deer hide to dry out at which point you need to brush it down to keep it supple.
As with all crafts, tanning deer hides is not a simple operation and the best way that you'll learn is from someone who already has that skill and is willing to teach. In time, this will become you and you'll have a useful skill to trade in a world where money has no meaning any more.
Return from Tanning Deer Hides to Old Time Skills


New! Comments
Have your say about what you just read! Leave me a comment in the box below.